I took a little time off yesterday, away from my lap top and away from those knitting needles. I decided to have a play with some wooden heart boxes I had acquired and an idea I had to cover them with recycled felt.
I used the rib from some old sweaters I had felted to wrap round the edge of the heart shape. I didn't have any glue (why would a knitter have glue?) but I did have some fabric interfacing , so I used that, trying my best to iron it down without burning my hands in the process. I had to sew the pieces together at the heart point as there was no way it was staying stuck together. Another piece of felt I stuck (again with the fabric interfacing) to the bottom of the box
I stuck some of the recycled hearts that I use for the heart garlands I sell on to the side of the other wooden heat shape , just to see if they would stick and heh! yes they did. I now have a treasure trove of hearts , somewhere pretty to store all my spare heart shapes.
It's not a perfect technique , but i did think it was worth sharing with you all. I love recycling things and if I can make something nice and pretty out of it then that's even better.
More Free tutorials from The Feminine Touch can be found here

I love my little knitting blog! I design / create unique, original high quality accessories. I sell what I make on Etsy and my own web site - thefemininetouchdesigns.co.uk. Some of my creations I have written up in to knitting patterns & kits which are now published on-line. Here on my blog I share what I have learnt, business wise & crafting wise and happy to promote other crafty sellers. You will find some of my personal experiences here too.
Showing posts with label thefemininetouch. Show all posts
Showing posts with label thefemininetouch. Show all posts
Friday, 9 January 2015
Wednesday, 12 November 2014
Revamping my web site TheFeminineTouch.org.uk
I had been talking to one of my knitting colleagues about the success of her web site, and she told me of an instance where all of a sudden she stopped getting visitors to her web site. Before that day she was getting at least one order a day from her web site and then nothing. So what did she do?
She contacted her web site account manager and asked for advise. They looked around and found something had been changed which affected the whole thing......... it got me thinking.
You see , even though I had a web site, I have only had one enquiry from it and when I checked through Google Analytics the number of visits my little web site was having was abysmal :(
So I thought, I need to contact my account manager, see if they can see what I'm doing wrong with my web site.
The reply was really helpful and made me wish I had contacted them earlier.
I'll break it down into blocks
1. SEO - metatagging
I can see that you have worked on your SEO, however it can take a minimum of 6 months to make an impact with your SEO and climb the rankings of search engines. Therefore for some more advice on your SEO I'd suggest taking a look at our fantastic guides.
I can see that you have filled out some meta information, but more could be added to help improve your search ranking. Just looking at your page Meta Info, not all of the fields have been filled in. Make sure to fill in <TITLE> Tag:, and the Metatag Description: and not just the Metatag Keywords.
If you had a shop set up within your website, then you could set up metatags for each of your products, which again helps for SEO purposes.
So what have I done? - set up products in my shop, currently about 40. I have also completed ALL the meta data , Title , Tags and Description for all my products and all the web pages.
2. Social media
I would also advise using social media to build a more public personality for your business. This way you can reach a wider audience and connect with other businesses who can help you grow. Why not take a look at our guides below on how to include Facebook in your site, as well as Twitter and maybe even Pinterest!
So what have I done? I have added twitter , facebook and pinterest widgets to my web site side bar so they get seen on all pages. I have also added some of my pinterest style guide boards to the home page.
3. Blog
A good way to keep people coming back is perhaps setting up a blog within your website. Maybe post something one a week, to keep your readers interested and coming back to see what you have been up too. I see that you have one with blogspot, but you can create your own blog within Create. That way the numbers being directed to your website thefemininetouch.org.uk should increase.
So what have I done ? nothing for now. I blog on a regular basis anyway here, maybe I need to make my web site more prominant on here.
4. Professional image banner
Maybe you could add a professional image banner to your homepage? This creates a nice motion banner on your page, which gives customers something interesting to look at, as it is not static. If you would be interested in adding this, please see the guide.
So what have I done? I have set up a banner , taken some of my products and re-photographed them , added some text and made them the size they needed to be for the banner.
5. Side bar images
Your images on the side column, which links you to your Etsy store. Instead of it being red, I may make the purple to go with the rest of the theme on your website, as it looks a little out of place.
So what have I done? completely the opposite , I have added a red theme into my banner so it blends in more.
In my next blog I'll tell you about other features I have added to my web site. In the meantime, please browse away.
Thursday, 26 June 2014
The 4 amigos
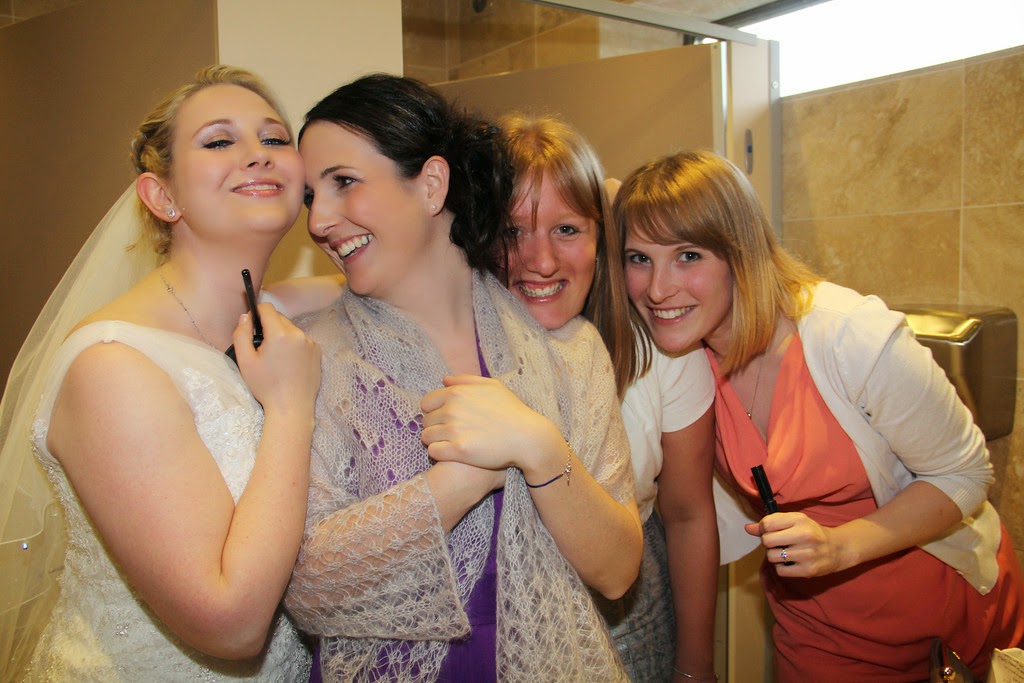
I found the most delightful photograph of my daughter Michelle when I was leafing through her friends wedding album.
I was looking for photos to use on my web site that would really show off the beautiful mohair wraps that I hand knit for the bridesmaids to wear. This photo so stood out.....
These 4 young lady's had been best friends at school. They had split up at 18 to go their separate ways , each of them to University in different towns , some of them coming back to live locally and then going away again. Each time they meet up its like a breath of fresh air to see them together. This photo portrays that.
Now here's one of the "real" wedding photos that shows off the wraps.
and a wedding montage that I have put together
PS Wonder how the photographer managed to sneak into the ladies
Friday, 16 May 2014
What to do with scraps of felt
I always knew I had kept my scraps of felt (from the making of cushions and bags) for a reason. My large bag full of the smaller bits and pieces
and the large stash under the bed was going to come in handy for my next project.
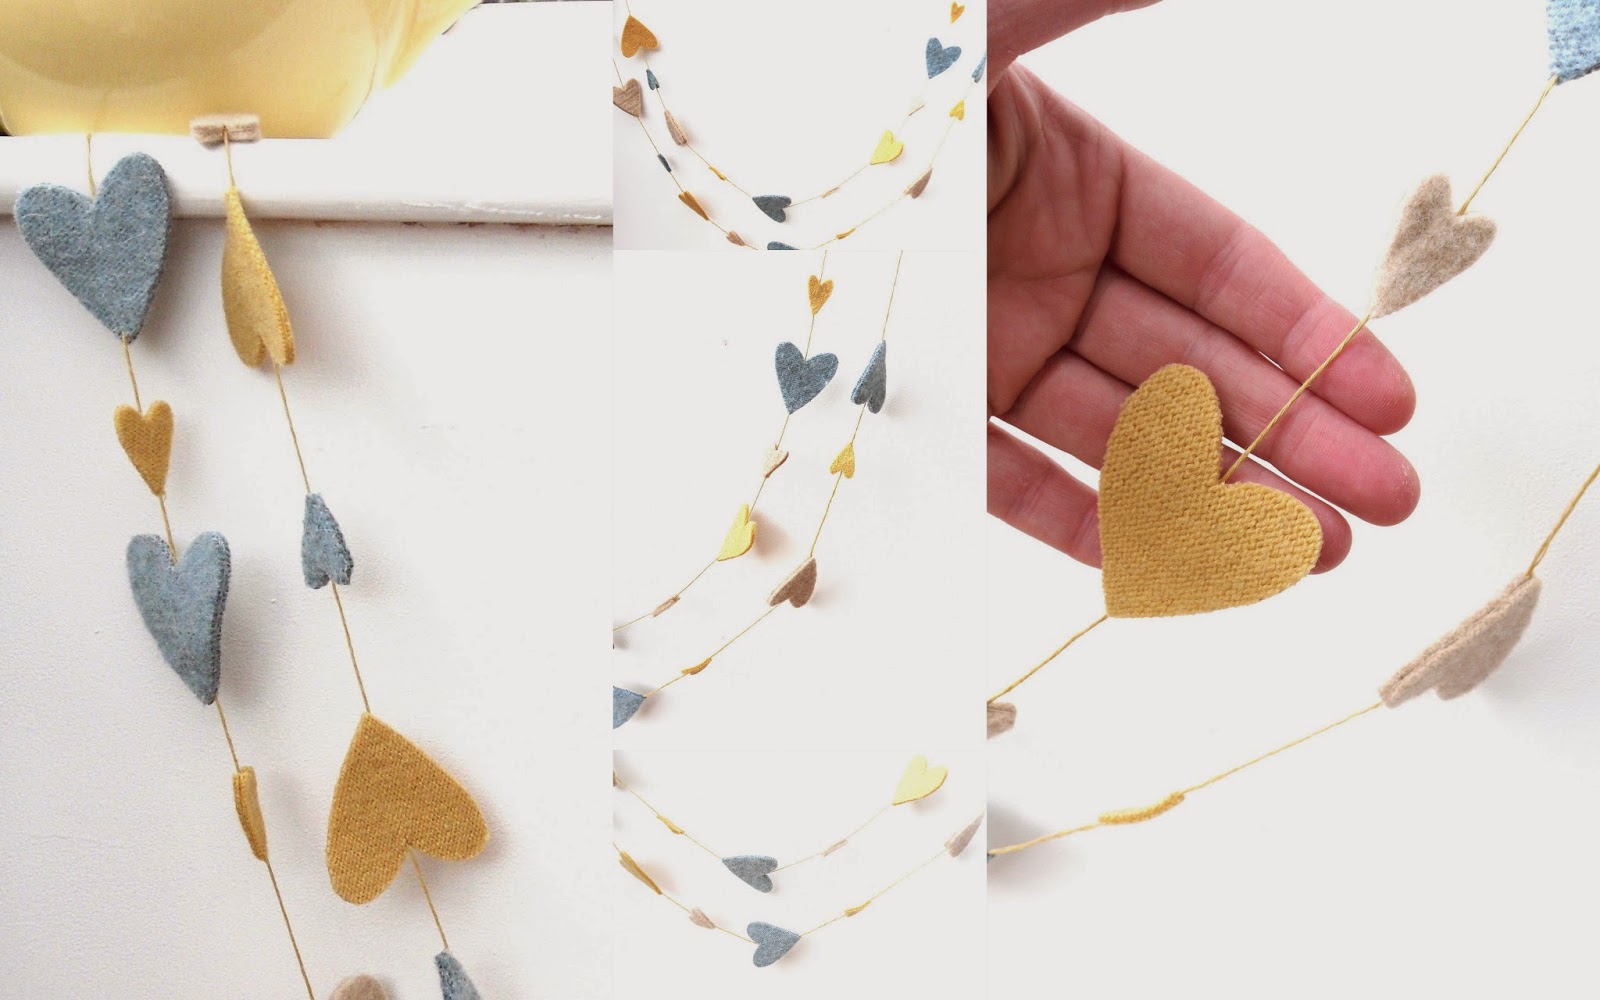
I had just bought myself one of those dieing machines (not one that coloured things , silly , one that cut things out) and was wanting to try it out straight away. It came with one die suitable for thicker fabrics such as felt , and within that die were 2 heart shapes. Ha ha I thought , pity I had missed valentines day , but everyone loves a heart or two any time of the year.
I had just made some felted buntings , you know the triangular pennant type and got a great response from my team mates on Etsy, so thought perhaps a smaller version (those die hearts were small) would do the trick.
Cutting out the hearts was so easy and fun to do , brilliantly taking little scraps of felt and turning them in to little shapes , finding out how many hearts you could get out of what was left of a sweater sleeve is great fun.
But I needed to work out how to string the hearts together in to a garland. I didn't want to machine sew my little beauties in to 1 large string of joined up hearts and I didn't want to have the string showing across the heart either.
The only way to do it in my mind was to thread the heart through 2 layers of them and that's what I did. That way not only can you move the hearts on the string , having the distance between them to what you want , I could also include some of the thinner felts and the fair isle knits in to the garlands too.
Do you have any recycled tricks of your own to share , then please let me know and I'll do my best to share
Monday, 7 April 2014
Home Sweet Home
My daughter Michelle moved in to her new home in January and this weekend was my first visit. Just thought I would share some of the crafty things I spotted in her house. It was lovely to see how she showed off her work (and mine) for her friends and family to see.
1. One of my knitted cotton peg bags , well used and full of pegs. You can buy these here or best of all , you can knit your own with your very own knitting pattern
2. Framed pieces of fabric. Very stylish and chic and best of all - cheap !
3. One of my fair isle knitted cushion covers snook its way into this woodland display.
4. One of Michelles "HOME" buntings hung over the fireplace. [NB. Don't worry the electric fire never gets turned on].
Just had to share
Thursday, 27 February 2014
Bunches of Grapes
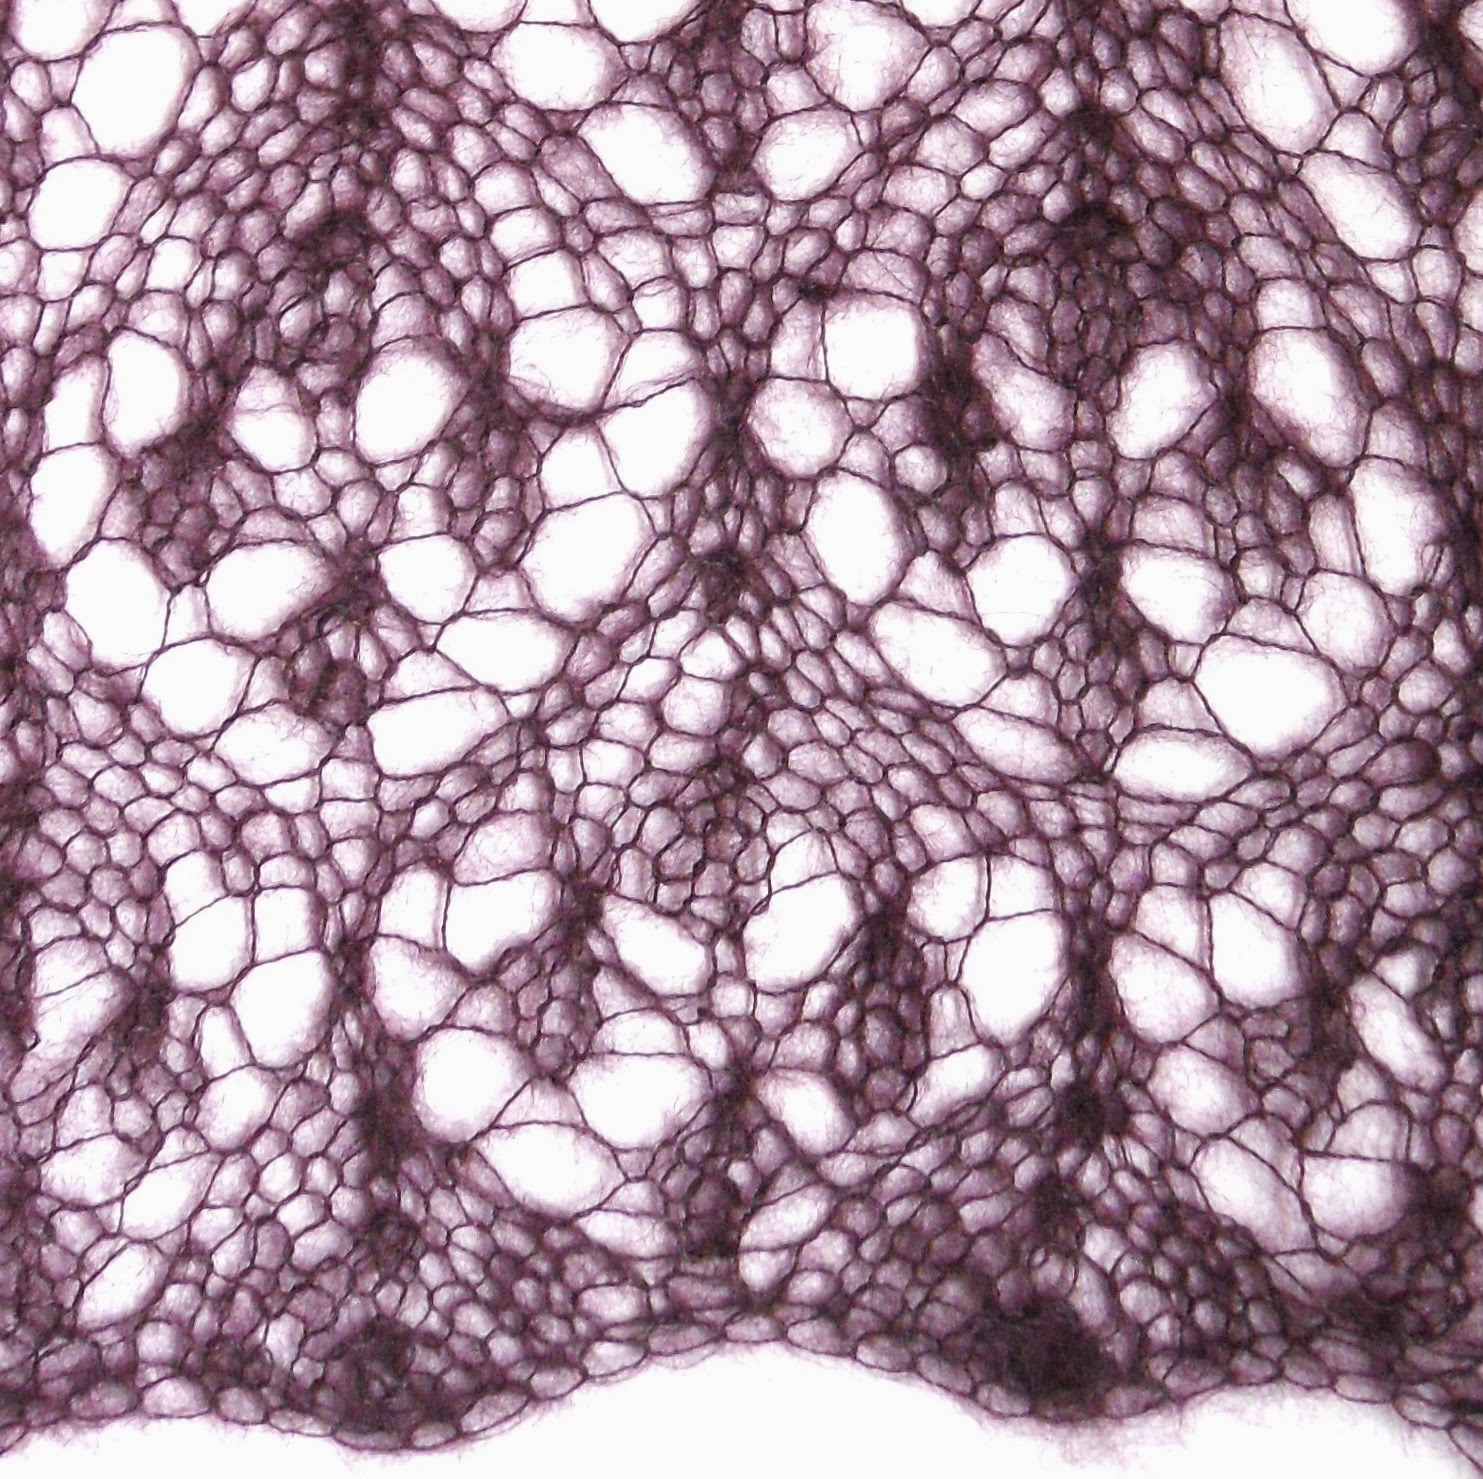
I have used the stitch pattern below and incorporated it in to one of my mohair lace scarves.
I have had some brilliant comments from people as to how beautiful the pattern is, so I thought I would share it with you. It did take me a little time to understand each row and there are still a couple of rows that I find a little confusing, so you may need to concentrate extra hard to get through those.
I used Rowan's KidSilk Haze yarn on 7mm knitting needles.
Instructions
Cast on a multiple of 10 + 1 stitch.
Suggest you add on a few stitches (say 3 ) to use for selvedge stitches and then knit these 3 stitches at each end of the row on ALL rows.
The stitches in the square brackets [] are the pattern repeat. If you make the item wide enough you can get in to a routine with these.
The stitches at the beginning of the row tend to mimic the end of the pattern repeat and replace the k3tog by a k2tog or a k3 by a k2. Same with the stitches at the end of the row, they mimic the start of the pattern repeat in the same way.
Row 1: k2tog, k3, [ yo, k1, yo, k3, k3tog, k3 ] , repeat [] to last 6 sts, then yo, k1, yo, k3, k2tog.
Row 2 and every even numbered row: purl all stitches.
Row 3: k2tog, k2, yo, [ k3, yo, k2, k3tog, k2, yo ] , repeat [] to last 7 sts, k3, yo, k2, k2tog.
Row 5: k2tog, k1, yo, k1, [ yo, k3tog, yo, k1, yo, k1, k3tog, k1, yo, k1 ] , repeat from [] to last 7 sts, then yo, k3tog, yo, k1, yo, k1, k2tog.
Row 7: k2tog, yo, k2, [ k5, yo, k3tog, yo, k2 ], repeat [] to last 7 sts, then k5, yo, k2tog.
Row 9: k2, yo, k3tog, [ yo, k1, yo, k3tog, yo, k3, yo, k3tog ], repeat [] to last 6 sts, then yo, k1, yo, k3tog, yo, k2.
Row 11: knit all stitches.
Row 13: k1, yo, k2, [ k1, k3tog, k3, yo, k1, yo, k2 ] , repeat from [] to last 8 sts, then k1, k3tog, k3, yo, k1.
Row 15: k2, yo, k1, [k1, k3tog, k2, yo, k3, yo, k1], repeat from [] to last 8 sts, then k1, k3tog, k2, yo, k2.
Row 17: k2tog, yo, k1, yo, [ k1, k3tog, k1, yo, k1, yo, k3tog, yo, k1, yo ], repeat [] to last 8 sts, then k1, k3tog, k1, yo, k1, yo, k2tog.
Row 19: k4, [ yo, k3tog, yo, k7 ], repeat from [] to last 7 sts, then yo, k3tog, yo, k4.
Row 21:k1, yo, k3tog, yo, [ k3, yo, k3tog, yo, k1, yo, k3tog, yo ], repeat [] to last 7 sts, then k3, yo, k3tog, yo, k1.
Row 23: knit all stitches.
Repeat rows 1-24 till necessary for completing your item.
Have fun x
Thursdays ColourWays - Coral
Most people instantly think of an orangey-red colour when they get asked ‘what colour is coral?
Many people remember it from when red coral was popular in the 70's and 80's. However coral can be found in almost any colour you can imagine.
Natural coral comes in a large variety of colour's: red, orange, pink, blue, white and black. Discolouration further increases the number of colours naturally available.
Precious coral or red coral is the common name given to Corallium rubrum and several related species of marine coral. The distinguishing characteristic of precious corals is their durable and intensely coloured red or pink skeleton, which is used for making jewelry.
The first recorded use of coral as a colour name in English was in 1513.
It can range from a shade of pink to a soft terracotta. It is also referred to as salmon, peach, apricot or melon.
A shade is achieved by adding black to any pure hue,
while a tint is created by mixing white to any pure colour.
I have tracked down the perfect clothes and accessories so you look right on trend wearing Coral and you help support the British handmade community too.
Mohair Scarf - TheFeminineTouch
Leather Shoes - FairySteps
Silk Purse - RedRubyRose
Lace Cocktail Dress - Alexandrakingdesign
Denim Coat -13threads
Long Earrings - Chikakojewellery
Did you know? - Coral is a female first name of Indo-European origins. It was the 943rd most popular name in the United States from 1900-1909, the 977th in 1991, and 988th in 1992.
Tuesday, 11 February 2014
Free Tutorial - Big Cable Cushion Cover
This cushion cover is knitted in 2 parts, with seams on 3 sides and then a zip fastening on the 4th side. It is assuming some knitting knowledge as the pattern for one of the sides will not explain the pattern row by row but will explain it in sections of knitting.
**** If you love the cushion but are unable to knit it , then why not purchase it from The Feminine Touch Designs here
The pattern has been inspired by a cable pattern I learnt at a Rowan Workshop back in 2012 called “Big Cables” held by Martin Storey.
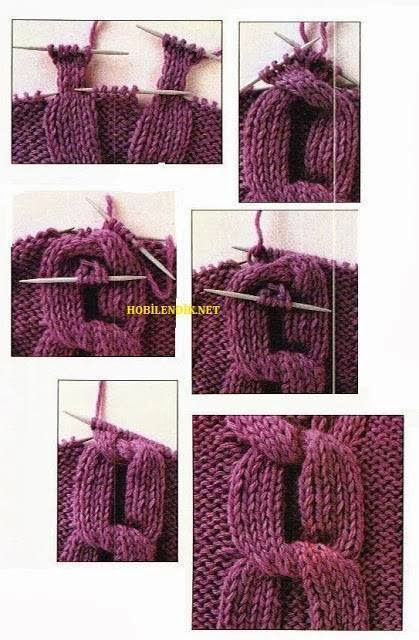
A few days ago, the same "Big Cable" popped up on my facebook notifications. I knew I just had to knit the pattern again and share it with you too. I have used the same photo explaining the big cable in my pattern, as I found it so easy to follow.
What you will need
- 3 100G balls of Rowan cocoon yarn (80% wool, 20% mohair)
- 6.5mm (UK 3, US 10.5) needles
- Darning needle and a sewing needle
- Straight pins
- 14” zip that coordinates with the cushion
- Matching sewing cotton
Cast on 50 stitches
Row 1 Knit 2, Purl 2 ........till last 2 stitches then Knit 2
Row 2 Purl 2, Knit 2 ....... till last 2 stitches then Purl 2
Row 3 Purl 2, Knit 2 ........till last 2 stitches then Purl 2
Row 4 Knit 2, Purl 2 ........till last 2 stitches then Knit 2
These 4 rows set the pattern. Repeat these 4 rows 20 times more
Cast off
Stage 2 - Side 2 (Big Cable side)
Cast on 55 stitches
The pattern is broken down in to 5 sections (A – E)
PS - If you get stuck following the pattern from the photos , then please email me and I'll help you all I can. Or full instructions for the cable knot are included in my hot water bottle cover pattern .
Knit a total of 84 rows
Cast off
Stage 3 - Sew the zip in place
With the zip closed and the right side of the knitting facing up, pin one side of the zip to the cast off edge of side 1, so that the knitting covers as much of the fabric part of the zip as possible.
Using matching thread, sew the zip to the project from the front, placing your stitches as close to the zip mechanism as you can, and taking care to make your stitches as invisible as possible.
Pin the second side of the zip to the cast off edge of side 2 in the same manner, unzipping the zip if necessary.
Sew this side from the front in the same way as before.
Turn the cushion to the wrong side and sew the zip flaps to each side, again trying to make your stitches invisible.
Stage 4 – Finishing off
Make sure you have the right sides facing you
Use one of the tail ends at either the cast on or cast off row and thread the darning needle with it
Use mattress stitch to join the sides.
Please feel to make as many of these as you like for personal use, but I would ask that you don't sell the finished items. Please do not reproduce any or all of the tutorial, without linking back to here.
Did you know ! Cables for the home are TRENDING NOW!
Heh ! If you like this free pattern and want to know as soon as I write another , then why not like my Facebook Page!
Thursday, 23 January 2014
Thursdays Colour Ways – Radiant Orchid
I’m getting ready for the International Colour Day on the 21st March , by writing my first “Colour” blog posting.
You will see my “Colour” blog postings always on a Thursday , and I’m going to call them “Thursdays Colour Ways”
And no surprise to you all , but the first colour I will be writing about is the gorgeous outstanding Radiant Orchid. Chosen by Pantone it’s the colour of 2014, it is both striking & beautiful . Its one of those colours where you have to have a lot of self confidence to wear it or have it in your house. But just think what you are missing out on if you don’t have anything in this colour.
I have scoured my favourite on-line site , one where I both sell and buy from – Etsy , its full of handmade & colourful goodies. Below are some radiant orchid items you might buy and wear.
Vintage Wool Hounds-tooth Draped Cocoon Cape - http://www.etsy.com/uk/shop/KheGreen
Big bold oversized statement handmade ring - http://www.etsy.com/uk/shop/StudioLeanne
Lace Collar Necklace - http://www.etsy.com/uk/shop/callmemimi
Geometric Acetate fabric String Bikini - http://www.etsy.com/uk/shop/sunclassixx
Brass Book Locket Pendant - http://www.etsy.com/uk/shop/Blucha
Purple hand knitted scarf - http://www.etsy.com/uk/shop/TheFeminineTouch ME!
HEART Personalized Leather Key Fob - http://www.etsy.com/uk/shop/Sakao
Extra long fingerless gloves hand knit armwarmers - http://www.etsy.com/uk/shop/irmasknittings
WoW , totally stunning and No , you wouldn’t probably wear more than 1 of these items at one time. Statement pieces to show off the rest of your wardrobe , perhaps.

I also found these lovely cushion covers on Etsy and its plain to see , the designers have decided that you should incorporate radiant orchid with other stunning colours. They have chosen green, white and grey. In this way the colour doesn’t overwhelm you , but it does bring the cushion to life , bringing it to another dimension.
Waverly Radiant Orchid and Green Pillow Cover http://www.etsy.com/uk/shop/ChloeandOliveDotCom
Lavender & Linen Colorblock Pillow http://www.etsy.com/uk/shop/JillianReneDecor
Then putting my Interior Designer hat on (I’m only part way through the course but that’s another story) , I thought , let's find some room layouts that incorporate the colour. Here are a few of my favourites.
Image from Decor6blog – Holly Becker best-selling author, pro-blogger, stylist and founder of decor8blog.com .
More wonderful room images using Radiant orchid - http://decor8blog.com/2014/01/21/how-to-decorate-radiant-orchid/
I love the subtle use of the colour , yes the rug that takes up most of the bottom half of the photo is in the glorious radiant orchid , but have you noticed the geometric cushion? or the book covers in the background? And.....just think what this room would look like without this colour included , boring and bland.
Decor Decom - http://www.decordemon.com/
From one extreme to the other , this room layout is transformed with beautiful geometric wall coverings in the gorgeous radiant orchid , along with white and greys . Silver and Black in the mirror and cabinet accentuate the wall too. Stunning !
And a simple rug , lamp and throw out in the garden , porch or conservatory
Bo Bedre - http://bobedre.dk/article/164526-nye-behov---ny-have/gallery/689090
This is my favourite !
Radiant Orchid blooms with confidence and magical warmth that intrigues the eye and sparks the imagination. It is an expressive, creative and embracing purple—one that draws you in with its beguiling charm. A captivating harmony of fuchsia, purple and pink undertones, Radiant Orchid emanates great joy, love and health.
From http://www.pantone.co.uk/pages/index.aspx?pg=21129
You will see my “Colour” blog postings always on a Thursday , and I’m going to call them “Thursdays Colour Ways”
And no surprise to you all , but the first colour I will be writing about is the gorgeous outstanding Radiant Orchid. Chosen by Pantone it’s the colour of 2014, it is both striking & beautiful . Its one of those colours where you have to have a lot of self confidence to wear it or have it in your house. But just think what you are missing out on if you don’t have anything in this colour.
I have scoured my favourite on-line site , one where I both sell and buy from – Etsy , its full of handmade & colourful goodies. Below are some radiant orchid items you might buy and wear.
Vintage Wool Hounds-tooth Draped Cocoon Cape - http://www.etsy.com/uk/shop/KheGreen
Big bold oversized statement handmade ring - http://www.etsy.com/uk/shop/StudioLeanne
Lace Collar Necklace - http://www.etsy.com/uk/shop/callmemimi
Geometric Acetate fabric String Bikini - http://www.etsy.com/uk/shop/sunclassixx
Brass Book Locket Pendant - http://www.etsy.com/uk/shop/Blucha
Purple hand knitted scarf - http://www.etsy.com/uk/shop/TheFeminineTouch ME!
HEART Personalized Leather Key Fob - http://www.etsy.com/uk/shop/Sakao
Extra long fingerless gloves hand knit armwarmers - http://www.etsy.com/uk/shop/irmasknittings
WoW , totally stunning and No , you wouldn’t probably wear more than 1 of these items at one time. Statement pieces to show off the rest of your wardrobe , perhaps.

I also found these lovely cushion covers on Etsy and its plain to see , the designers have decided that you should incorporate radiant orchid with other stunning colours. They have chosen green, white and grey. In this way the colour doesn’t overwhelm you , but it does bring the cushion to life , bringing it to another dimension.
Waverly Radiant Orchid and Green Pillow Cover http://www.etsy.com/uk/shop/ChloeandOliveDotCom
Lavender & Linen Colorblock Pillow http://www.etsy.com/uk/shop/JillianReneDecor
Then putting my Interior Designer hat on (I’m only part way through the course but that’s another story) , I thought , let's find some room layouts that incorporate the colour. Here are a few of my favourites.
Image from Decor6blog – Holly Becker best-selling author, pro-blogger, stylist and founder of decor8blog.com .
More wonderful room images using Radiant orchid - http://decor8blog.com/2014/01/21/how-to-decorate-radiant-orchid/
I love the subtle use of the colour , yes the rug that takes up most of the bottom half of the photo is in the glorious radiant orchid , but have you noticed the geometric cushion? or the book covers in the background? And.....just think what this room would look like without this colour included , boring and bland.
From one extreme to the other , this room layout is transformed with beautiful geometric wall coverings in the gorgeous radiant orchid , along with white and greys . Silver and Black in the mirror and cabinet accentuate the wall too. Stunning !
It doesn’t just have to be living rooms that can be brought to life with radiant orchid. Just look at this kitchen ! It so makes you want to cook AND bake !
WA Designs - http://www.houzz.com/photos/461005/Stinson-Beach-House-beach-style-kitchen-san-francisco
WA Designs - http://www.houzz.com/photos/461005/Stinson-Beach-House-beach-style-kitchen-san-francisco
And a simple rug , lamp and throw out in the garden , porch or conservatory
Bo Bedre - http://bobedre.dk/article/164526-nye-behov---ny-have/gallery/689090
This is my favourite !
Radiant Orchid blooms with confidence and magical warmth that intrigues the eye and sparks the imagination. It is an expressive, creative and embracing purple—one that draws you in with its beguiling charm. A captivating harmony of fuchsia, purple and pink undertones, Radiant Orchid emanates great joy, love and health.
From http://www.pantone.co.uk/pages/index.aspx?pg=21129
Tuesday, 7 January 2014
My 1st New Years Resolution - DONE
At the very end of last year , I endeavoured on a little project , aimed at trying to get more views to this blog and also the one at Uniquely UK. I was inspired by my friend Simmi , who was already doing the same. Both of us wrote some little freebie tutorials , simple instructions with whacking results. The number of views we get from these postings on a daily basis is stupendous!
I'd always planned that one year I would expand my little hobby to include selling knitting patterns that I had designed and written up. Well this year is that year! It came to me out of the blue again last week , and here I am a week later with 2 knitting patterns under my belt and another that is in the finishing stages.
Its a brilliant feeling to see my patterns written up professionally instead of scribbled on bits of paper that I lose on a daily basis. For me , it means that I don't have to rethink how to knit something I designed , I can just refer to my own pattern. The stress of those custom orders has gone away!
But most importantly I can get my designs out there in the public domain. Yes some I will charge for (only £2.80 at the moment) and others I will post on my blog for free. I'll be offering tips and guidance on my blog too, just to help people get started or help them get over a difficult concept.
So this is my 1st New Years Resolution DONE !. Now I have started , believe you me , I will continue , for this year and beyond.
Happy knitting ..........
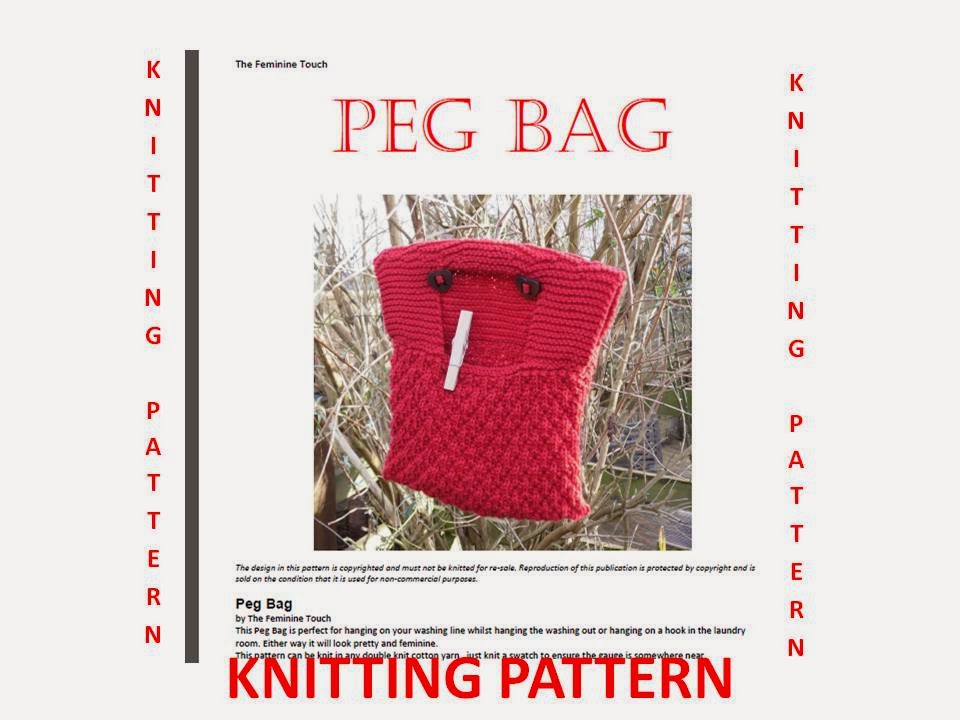 |
| Peg Bag knitting pattern |
 |
| Hot water bottle cover knitting pattern |
Monday, 16 December 2013
Free Tutorial - Knitted child's bracelet
During the autumn I was asked by one of my friends if I could possible knit a chunky bracelet for her youngest daughter.
I have finally got round to writing up the process for you all.
For this project you will need
Hope you will enjoy making this child's bracelet.
Heh ! If you like this free pattern and want to know as soon as I write another , then why not like my Facebook Page!
I have finally got round to writing up the process for you all.
For this project you will need
|
|
|
1 wooden bracelet with a diameter of approx 88mm
and a dark wooden button
|
Small quantity of cream cotton yarn
|
Instructions
Step 1. With cream cotton and appropriate sized knitting needles (see
ball band) Cast on enough stitches to make the width of knitted item twice
the width of the bangle. For the bangles I used , the width was 23mm , so my knitting was
46mm using 4mm needles.
|
|
|
Step 2. Knit in Moss stitch
Row 1 K1, P1, K1 , P1 .............K1
Row 2 Same as Row 1
Repeat these 2 rows until the length of the knitting measures the
circumference of the bangle. Check this out by wrapping the knitting round
the bangle before you do the final cast off.
|
||
Step 3 Cast off
You should end up with a cream band , approx 88mm x 46 mm.
|
|
|
Step 4. Sew button on to cream band in a central position.
Step 5. Sew 2 narrow ends of band together
|
|
|
Step 6. Place band around wood bangle and sew in place , align
stitches to be in the middle of the
inside of the bangle.
Step 7. Sew in any ends.
|
|
|
Hope you will enjoy making this child's bracelet.
Remember, if you make any of these lovely bracelets , then send photos to TheFeminineTouch and I will feature them on facebook or in my blog (or both).
Please feel to make as many of these as you like for personal use, but I would ask that you don't sell the finished items. Please do not reproduce any or all of the tutorial, without linking back to here.
Please feel to make as many of these as you like for personal use, but I would ask that you don't sell the finished items. Please do not reproduce any or all of the tutorial, without linking back to here.
Heh ! If you like this free pattern and want to know as soon as I write another , then why not like my Facebook Page!
Subscribe to:
Posts (Atom)

