Showing posts with label work in progress. Show all posts

Saturday, 24 January 2015

Knitting Diagonal Stripes with mosaic knitting


A little mosaic knitting


I always thought that knitting diagonal stripes would be very tricky. Yes I could see that Fair isle knitting would work, but I wouldn't fancy knitting the wrong side, I'm sure I would not only get my threads in a tangle but my mind too, working out which way the stripe was going. 

Right side......>


 So imagine my amazement when I found this great little trick with mosaic knitting. Not only is it really easy to do , once you have done the first 4 rows , but there are no tangled threads and you can't go wrong really.    

And the wrong side is nearly as cool as the right.

<......Wrong side


My daughter, Michelle watched me this morning whilst I worked a couple of rows and she summoned the process up in a way that I never thought. 
She said that whilst you knit the row in one colour you leave stitches behind so that they could be knit in the other colour later on.  I think she summed up mosaic knitting rather well. 

The article below nicely explains the difference between fair isle and mosaic knitting when working the same pattern. It's a great intro to mosaic knitting.


http://readknittingpatterns.com/rkp/introduction-to-mosaic-knitting-part-1/


Saturday, 17 January 2015

Found these great knitters font!

Wow! , that's all I can say. 

These have been on my "to do list" for the last few years. I thought some unique knitters fonts would brighten up my photos that I put in my blog and I had been planning on making some myself. It's one of those jobs you never get round to doing as you know it will be a mammoth job.

Last night , whilst scooting around BlogLovin I found someone else that had done them and most importantly she is letting both you and me have them for free.

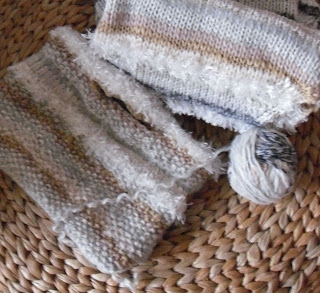
I'm talking about the great Knitters fonts that you can see in my crafty Mosaic knitting WIP photo below. 


I can't keep a secret , so here's where I downloaded them from - Laylocks Designs wonderful blog

 I so LOVED knitting this mosaic knitting. 

Come back later to see the finished article and to access the knitting pattern, where I have simply explained a little of the mysteries of mosaic knitting. Its a knitting technique I plan to come back to again and again so watch this space.

Tweedy Mosiac knitted shawl for Sale

Tweedy Mosiac shawl knitting pattern 

Thursday, 1 January 2015

Happy new Year - My 1st day - pattern writing !


I feel like I'm at the very start of a big adventure this next year. I've just spent today finishing off doing all the maths calculations for a knitting pattern that will be published in the KnitNow knitting magazine in May. Quite daunting stuff , seeing as though I have only dabbled in pattern writing these last few months , going through the testing regime on Ravelry and publishing a few simple patterns on their site , plus Craftsy and in my Etsy shop.

KnitNow have kindly agreed to publish BOTH patterns that I submitted to them a few months back. So I have been spending the last month knitting up the garments and writing up the patterns. Both have been quite challenging for me. Its been great to see my ideas come alive in front of me , in different (but yet beautiful) yarns than I had originally knit them in. I can't tell you much about the yarns or the patterns (sneak preview of colours below), but I can tell you that I have improved my charting techniques (and incorporated new stitches in to my charting software) and my pattern writing skills 200 fold! It's been quite a learning curve. 

So the 1st day of the year I have been busy finishing the patterns. Now they are finished I can send both the knitted items and the patterns to KnitNow tomorrow and sit back and wait. Keeping fingers crossed that not too many questions some back at me.  

(sorry couldn't resist the silly cartoon image above , its so reminds me of me , a few years younger with shorter curlier hair) 


Monday, 10 November 2014

A beginners perspective

 Inspired by my yarn bombing knitting colleagues that I met in York a couple of weeks ago I decided to really have a go at publishing my knitting patterns on line. 

All the knitting I do for my Etsy shop is made up from little snippets of patterns and information from elsewhere , I make some scribbles so I can make another if I need to. I had formally written up some patterns , had them for sale on Etsy but no one had purchased them. I didn't know if they worked or not.

I was told that Ravelry was the place for getting your patterns tested by both the experienced and inexperienced knitters. Great I thought , that's one way round my dilemma. So off I trotted and posted a few of the patterns I had already made on to the ravelry testing forum.

I then went to work on a new pattern, something simple I was told , something that anyone could knit up as a Christmas present using up an odd ball of yarn.

So I came up with my headband pattern , such a simple knit I thought and such a simple pattern. I put it to the testing forum on Ravelry and I also asked my Craft Britannia team mates on Etsy. 

Jill from Fabrilushus piped up saying she could only just knit , could she test it out from a beginners perspective. 

What a great idea ! so i sent her the pattern , answered a couple of her questions and off she went.

She now has finished the headband and this is what she says


"Anyway, i am finally finished! I know you have got it listed now anyway and that it is doing well but I thought you would still like my beginners perspective.

It is a great beginners pattern! Very easy knitting, grows very quickly and gives a lovely effect. I really like it. I did find the finishing off a little tricky but managed with no mishaps. 


 I found that I couldn't actually get my 3rd needle through the stitches whilst they were on 2 needles so I got around it by transferring each individual stitch on to the working needle and then knitting them together! The tieing off bit to pull it together was fine.


I think the pattern does make sense for a beginner and I love the photos.

I only have one comment where I think you could add something and it is purley for Numpty beginners like me...... you mention that if you wish to have a narrower band to just reduce the number of stitches. I think it may be worth saying that it must be an odd number of stitches otherwise the pattern will not work. I did not know that until you told me and suspect that other beginners won't.

Thank you so much for letting me test your pattern. Sorry it took an age! I am attaching photos for you. The ones of me are terrible as they are selfies with my phone but I did want you to see that the finished article is perfectly wearable. Even makes a good mini cowl and I have actually worn it like that with my coat this weekend. It works well if you don't want lots of bulk" 


 If you want to try out this same pattern , then it can be purchased here 

Monday, 3 November 2014

Angel Cable

I came across a cable pattern called "Angel Cable" a few days ago and I was intrigued to try.  I have worked with cables for a few years now , just straight forward cables going up and down your work , twisting in and out of stitches, but this cable intrigued me because it was incorporated into some clever stitch increases and decreases.

I wanted to adapt the pattern I found though , wanted to make purl columns narrower , wanted a finished edge to each side, maybe with the potential of making something like a headband with it.

So I decided to use a little bit of software I have just bought. Nice and cheerful Interwined Studio can create charts out of written instructions or can work out the written instruction from a chart. Either way its pretty nifty and I wanted to play :)

I won't go into the ins and outs of what I did , but just to say , adapting the original pattern was a lot easier than knitting the piece and nearly as enjoyable (remember I am a computer geek).

So here's the finished results.  And yes , I did adapt the knitted piece beyond the pattern. I got carried away you see.


and for those of you interested here is the pattern , both the chart and written instructions


Cast on 26 stitches
Row 1 (rs): k9, p8, k9
Row 2 (ws): p9, k8, p9
Row 3 (rs): k7, ssk, p3, m1, p2, m1, p3, k2tog, k7
Row 4 (ws): p8, k3, p1, k2, p1, k3, p8
Row 5 (rs): k6, ssk, p3, m1, k1, p2, k1, m1, p3, k2tog, k6
Row 6 (ws): p7, k3, p2, k2, p2, k3, p7
Row 7 (rs): k5, ssk, p3, m1, k2, p2, k2, m1, p3, k2tog, k5
Row 8 (ws): p6, k3, p3, k2, p3, k3, p6
Row 9 (rs): k4, ssk, p3, m1, k3, p2, k3, m1, p3, k2tog, k4
Row 10 (ws): p5, k3, p4, k2, p4, k3, p5
Row 11 (rs): k3, ssk, p3, m1, k4, p2, k4, m1, p3, k2tog, k3
Row 12 (ws): p4, k3, p5, k2, p5, k3, p4
Row 13 (rs): k2, ssk, p3, m1, k5, p2, k5, m1, p3, k2tog, k2
Row 14 (ws): p3, k3, p6, k2, p6, k3, p3
Row 15 (rs): k1, ssk, p3, m1, k6, p2, k6, m1, p3, k2tog, k1
Row 16 (ws): p2, k3, p7, k2, p7, k3, p2
Row 17 (rs): ssk, p3, m1, k7, p2, k7, m1, p3, k2tog
Row 18 (ws): p1, k3, p8, k2, p8, k3, p1
Row 19 (rs): k1, p3, c8b, p2, c8f, p3, k1
Row 20 (ws): p1, k3, p8, k2, p8, k3, p1
Row 21 (rs): k1, m1, p3, k2tog, k6, p2, k6, ssk, p3, m1, k1
Row 22 (ws): p2, k3, p7, k2, p7, k3, p2
Row 23 (rs): k2, m1, p3, k2tog, k5, p2, k5, ssk, p3, m1, k2
Row 24 (ws): p3, k3, p6, k2, p6, k3, p3
Row 25 (rs): k3, m1, p3, k2tog, k4, p2, k4, ssk, p3, m1, k3
Row 26 (ws): p4, k3, p5, k2, p5, k3, p4
Row 27 (rs): k4, m1, p3, k2tog, k3, p2, k3, ssk, p3, m1, k4
Row 28 (ws): p5, k3, p4, k2, p4, k3, p5
Row 29 (rs): k5, m1, p3, k2tog, k2, p2, k2, ssk, p3, m1, k5
Row 30 (ws): p6, k3, p3, k2, p3, k3, p6
Row 31 (rs): k6, m1, p3, k2tog, k1, p2, k1, ssk, p3, m1, k6
Row 32 (ws): p7, k3, p2, k2, p2, k3, p7
Row 33 (rs): k7, m1, p3, k2tog, p2, ssk, p3, m1, k7
Row 34 (ws): p8, k3, p1, k2, p1, k3, p8
Row 35 (rs): k8, m1, p2, p2tog, p2, p2tog, p2, m1, k8
Row 36 (ws): p9, k8, p9


Thursday, 7 August 2014

Our stay at Strontian, Scotland

On our travels to the Hebridean islands we stopped at a wee village called Strontian (Srón an t-Sithein), on the shores of Loch Sunart, Argyllshire, Scotland. It is the main village in Sunart, an area in western Lochaber,Highland, Scotland, on the A861 road. It lies on the north shore of Loch Sunart, close to the head of the loch.

We were heading for the Sunart camp site , run by Tim and Lynn originally from Huddersfield , Yorkshire. Tim runs the camp site , Lynn runs her own crafty gallery shop / workshop. 

As soon as we entered the village I saw the sign that the chemical element strontium was named after the village. Me being a scientist at heart had to find out more.  I didn't see any more reference to it in the village so I did a little research on line
view from the village pub
This is what I found- 
Adair Crawford who was trained as a physician was also interested in chemical research. For a period of time, he was on the staff at St. Thomas's Hospital in London, England, and a professor of chemistry at Woolwich University.
In 1790. He was studying barium minerals and found a new (not barium) element in minerals found in the lead mines at Strontia. He called the element strontia from which the samples came. Strontia was later found to be a compound of strontium and oxygen. In 1808, Davy found a way to produce pure strontium metal. He passed an electric current through molten (melted) strontium chloride. The electric current broke the compound into its two elements:


Strontium and its compounds have relatively few commercial uses. Interestingly compounds of strontium are sometimes used to colour glass and ceramics. They give a beautiful red colour to these materials. Strontium compounds also provide the brilliant red colour of certain kinds of fireworks.

That evening , being a little fascinated by the subject , I was trying to come up with a new fair isle design. 


Don't you think it looks rather like a chemical element , electrons circling the inner neutron. I thought I might call it the "strontium" pattern.

I will be incorporating this design into my fair isle work in the next few weeks. I'll post here when I do.

Friday, 18 July 2014

Playing with patterns

I have been wanting to design some of my own fair isle patterns for the last few years and I've finally taken the plunge. As part of my research I started looking into fair isle patterns in general , how a simple little charted pattern can transform in to a new pattern by simply stringing a few little patterns together or by turning patterns upside down .

For example this simple pattern 


can be turned in to the pattern below by laying two patterns side by side and then again underneath.


and then it can become even more interesting when you start turning patterns upside down 

 So looking forward to knitting this pattern and playing around a little more.I may even add some more detail to it , make it a little more intricate , see what a difference that will make. Keep tuned , just in case I do.......


Monday, 10 February 2014

A little Christmas gift

This was the first Christmas ever that I was asked by friends and family to knit their Christmas presents. I really felt that I had come to an impasse in my knitting and I knew I had to make a success of everything I was asked to make, otherwise my knitting wouldn't be taken seriously by my family.

Sam and Dave came for a visit this last weekend and I'm glad to say both of them came with their home made knitwear. I knit Dave a warm woolly hat , which he wears ALL the time ! , he does take it off for bed , lol


And Sam designed her own gloves , chose the colour , chose the fair isle designs she wanted incorporating and chose the style of glove. She says they are perfect !


 I worked them in the round , which I found rather fiddly for me, but the results are worth it , no side seams and the fair isle pattern just continues round , perfect.


She loves the part of the mitten that comes over the fingers to keep them nice and warm.


Wonder what Christmas gifts I will be making next year.

Sunday, 2 February 2014

My craft room (part 1)

Woop ! I’m getting a little giddy. 

My new pad is almost ready for me to move in :)

My new pad , is my new craft room in my partners house. He has asked me to move in after 16 years ! together , and after I redecorated some of the bedrooms and started work on the craft (my) room , I said “Yes” . 

My craft room is the little bedroom , that used be kitted out with young girls cartoon doggy wall paper and matching curtains and lampshade.   His daughter uses that room when she comes to visit and is now 26 , so very much time for a change! The only conditions I was given was that the single bed stays in the room (so she can still come and visit ~ of course) and that I would replace the wallpaper with something bright and feminine. 

The rooms not quite finished , there are still shelves to put up, books to be organised , curtains to be made (maybe) but I couldn’t resist showing you what’s already been done. 


The built in wardrobe has been turned in to my yarn store. I have used those flexible storage (for shoes and sweaters) shelves to organise my yarns. These hang down from the wardrobe rail and cost me around £12 for 3 sets, that’s all. 


There were already some shelves to the right which I used for more yarn. I have used one of those shoe tidies to hang over the wardrobe door for spaces to organise yet more stuff. Bags and boxes of yarn that I have yet to sort through have been stuffed up into the top cupboard.  You know something , I love this , it’s great to start a knitting project and go for a browse in your very own yarn store. 


I just had to get rid of the silly girly lampshade. I wanted something original and unique and something to show off my craftiness. The knitted lampshade was inspired by some photos I had seen on the Internet. Knitting a lampshade seemed the logical conclusion, all it took was a bit of maths brainpower to calculate how many stitches to use and how often I need to decrease to make the lampshade shape.  The only thing that concerned me was ensuring the shade was fire resistant , otherwise I would never dare turn the light on. I was helped out by one of UUK colleagues , who advised me of some fire resistant spray to use , Phew , all sorted. 


Please come back to see part 2 of my craft room


Monday, 30 December 2013

2 hats , 1 pattern

I decided to try my hand at knitting a woolly hat as a Christmas present for my daughters boyfriend. I had some beautiful 100% wool in grey and thought it would knit up wonderfully. As it was my 1st time knitting a hat (and I wasn't planning on selling the hat , just giving it away) I scoured the Internet looking for the perfect easy pattern. 

This web site "Tin Can Knits"  came up trumps for ::: irresistible modern knitting patterns ::: 

They have created The Simple Collection - a 100% learn to knit series, including 8 excellent free patterns and in-depth tutorials.

They say that "Whether you are knitting your first scarf, cozy socks for your dad, or a sweater for your little man, the Simple Collection will teach you all you need to know to make modern seamless knits for the whole family!"

The Barley pattern is the one I decided to use. With a lovely mix of simple garter and stocking stitch , I thought I could just concentrate on getting my gauge right and knitting in the round.
Barley Hat by Tin Can Knits

 I started knitting the pattern in the lovely grey yarn , only to be told by my daughter that her boyfriend had a passion for woolly hats , the more colourful the better. It was then I decided that perhaps grey wasn't the best choice.

I started again , rifling through my stash to find a colourful chunky yarn. The only yarn I could find suitable was some Sublime tweedy yarn , a stunning black with flecks of colour in it. I did however find some vibrant left overs of Rowan Big Wool which I thought would make a stunning pom pom for the top of the hat. 

Here are the finished hats. The grey one has now become mine , I love it fits tight on my head with the rim of the hat turned over once or twice. It really shows off the different stitching.

And yes, the pom pom on top of the black hat is huge , but it is LOVED !

Tuesday, 12 February 2013

Prototyping

After I went on my fairisle course last year I have been wanting to incorporate fairisle into my work for sale on Etsy. Today was the day that I decided to have a play.

I took a strategy I had learnt in my full time work , that of building a prototype , something that could easily be delivered with the tools I had already and that could be shown to people to get feedback and views.

I was going to build a prototype! I always knit a swatch anyway when working with new yarn , knitting new stitches or combining colours together but this time I was going to be concentrating on colour combinations and the pattern and incorporating the whole thing in to a finished article.

I had already knit quite a few fingerless gloves so had the basic shape already in my head.

 I had purchased some yarn the other day to knit into cushion backs but it was not suitable so I decided that I could use this is in my prototype.

And most importantly two of the colours matched my new casual coat so I could knit the prototype for me to wear with my coat. I love showing off my work.


I picked up the 1st pattern book with some fairisle patterns in and quickly decided on one that had inspired me.

I liked the look of the 2 blocks of pattern at the bottom , nice and simple. So after knitting the rib I knit these rows. 

 But I had a problem straight away , the 2 colours I picked , the 2 colours that matched my coat were too similar to each other , they blended in. Not the look I was after at all.

But I continued.

Once I had knitted the thumb , I restarted the fairisle pattern. This time trying to do the top block of pattern.

I decided to incorporate another colour into the pattern, hoping that this would bring the colours to life.


so a little green has been used before finishing off in the mustard and the ribbed top.


And here's the finished prototype and I like it ! it brings my coat to life !

but there is room for improvement don't you think?


Want to see the end result , perfected a few days later?  https://www.etsy.com/listing/123611835/rustic-fairisle-handwarmers-womens

Friday, 24 June 2011

Big Knitting - Guess what it will be

For my birthday at the beginning of June I received some very large knitting needles 25mm diameter , which is over twice the size of any needles I had in my tube of knitting needles ! Wow I thought , I should really be able to create some monstrous creations in record time now. 

Of course in reality this never happened. Big knitting needles have their own problems and there is no way that you can go at any speed.  You have to have lots of space as it is impossible to tuck the needles under your arm pits as you do with ordinary sized needles. I took over the 3 seater settee when using mine. 

Casting on and doing the 1st row is probably the most difficult and then once you have got over that you are on your way.

My 1st item is on Etsy , unfinished !! I created a sort of guessing game to try and get people interested and to try and get some hearts on the item before it was actually finished. Here it is- http://www.etsy.com/listing/76119823/big-recycled-red-chunky-cashmere-knitted . Please heart if you want to see the finished result.
Big Recycled Red Chunky Cashmere knitted on BIG needles. What am I going to be Big Recycled Red Chunky Cashmere knitted on BIG needles. What am I going to be Big Recycled Red Chunky Cashmere knitted on BIG needles. What am I going to be
The FeminineTouch has started knitting me in this gorgeous recycled cashmere yarm , so thick and beautiful you wouldn't believe it.

She is knitting me using a pair of enormous knitting needles with a 25mm diameter , so big that you can only fit around 30 stitches on it!

Notice the 20p piece in the photo , WOW ! I'm going to be truly BIG !

She needs to find some chunky recycled buttons or beads for fringing to enhance me even further , and in the meantime she is going to keep you (and me) guessing as what my role in my new life is going to be.

If you want to see how I turn out , then please "heart" me , so you can keep track of me

Please do not purchase me yet , I'm not ready and the price and shipping costs have not been worked out correctly

TheFeminineTouch tells me she intends knitting more accessories with her enormous knitting needles so you need to keep an eye on her too.

Sunday, 22 May 2011

Custom Order - v shaped orthopedic cushion / pillow cover

Morning everyone


I mentioned the custom order in a recent post. Well it's finished now and I thought you may be interested in the finished result. 

Also I would like some comments from you all as to whether you think it's something I should be adding to my shop. Maybe giving the customers a choice of fabrics and colour of yarn.

Also , whilst I was knitting it , I was concience of keeping the shaping as simple as possible because then I could write this up as a pattern to sell on-line. Again , if you could leave a comment if you have had experience of making and selling pdf patterns it would be much appreciated.

Anyway to get back to the main point , below are some piccies taken of the finished cushion.

A close up of the knitted side of the pillow

The other side

In situ

Saturday, 16 April 2011

The wonders of crochet

I mentioned in my last blog post , how I had been on a creative knitting workshop weekend and it had turned into a wonderful weekend where I learnt to crochet.

Well I have been practising some more during this week and I'm here to show you my creativity. It's big! so watch out!
 This was made using double strands of Rowan Big Wool. Somehow I am going to create 1 huge cushion and have this motif on the front of it.

 More circles , stars and squares , again made out of Rowan Big Wool. Not too worried about any unevenness , because once I felt this wonderful wool they all disappear!

And here's the felted result. Really looking forward to posting these on Etsy, see what feedback I get.

Wednesday, 13 April 2011

Creativity in crochet

Went shopping this lunch time for some new tools for my craft. Yes bought a couple of crochet hooks !

I'm a knitter than can now crochet.

Always wanted to do it , I've tried following patterns and watching videos on the Internet but never got it. I've always been envious of those little pretty flowers and elegant table mats and always wondered whether I would ever get to a stage in my life where I could make them myself. Well I'm there now !

And how did I do it? you ask. I attended a lovely "creative knitting" workshop last weekend and spent all the weekend near enough having 1:1 tuition. I have crocheted 1 massive motive on size 15mm hooks (the creative knitting was all about making large things using chunky wool on large needles or hooks) and I have learnt how to read patterns.

And now I am at home , having purchased size 3.5 and 5mm hooks and wonder how I'm going to do it. A small delicate flower sounds so fragile after I've been crocheting with those massive size 15mm hooks.

Stay in touch..............I'll let you know

Saturday, 5 March 2011

Recycled Orange felted bag

I told you some while ago that I purchased a lively bright orange cardigan from my local charity shop and that I wanted to make some sort of bag with it.

Well here it is - finally finished !! 
with a lovely coordinated lining 


and a lovely relief felted and beaded flower


I love my felted projects !

Thursday, 3 March 2011

Cute Clutch bag from a Recycled Jumper

I'm just going to let you in a little secret. I pulled back one of my daughters jumpers the other day. One that I bought her when she was about 10 or 11 (she is now 24) that she decided she didn't want anymore (wonder why).

I have made a lovely little clutch bag !

Photo shows what is left of the jumper (top right), a ball of wool (bottom right) I wound off the jumper and the little clutch bag (left)

Because its been knitted in moss stitch it really shows off the colur combinations and the differences in textures. I love it !  and I love it even more because I've created it with just a little love and attention from me.

Here it is on Etsy - http://www.etsy.com/listing/58803874/hand-knit-lace-scarf-shawl-wrap-in-soft

Tuesday, 1 February 2011

Be My Valentine , the upcycling way

The rose is red, the violet's blue
The honey's sweet, and so are you
Thou are my love and I am thine
I drew thee to my Valentine
The lot was cast and then I drew
And Fortune said it shou'd be you.
Valentines day , traditionally a day when flowers , chocolates and cards are given to lovers the world over.

Since starting my shop - http://www.etsy.com/shop/TheFeminineTouch TheFeminineTouch back in September I've been wondering how I could bring recycled products to you this Valentines day.

And now I've done it...........


Last week I finished my 1st flower brooches made from recycled woollen jumpers. They are really cool. I can't wait til I get source some more woollen jumpers of different colours , but until then these 3 purple / blue combinations will do as a preview.


Felted flower brooches are available from these other etsy shops too -


 http://www.etsy.com/shop/Nimblejacks?ref=seller_info

http://www.etsy.com/shop/remadeshop?ref=seller_info

Quick View of Woolly Goodies available on my web site

Quick View of Woolly Goodies available on my web site
Click on photo above to see detail / to purchase